Showing posts with label google. Show all posts
Showing posts with label google. Show all posts
Thursday, April 7, 2011
Google Maps
How-to Video
Add a placemark to the PUFS TTP 2011a Map
(your home, school, favorite vacation spot, etc. )
Here is a the TTP in Sacramento Map
View TTP in Sacramento in a larger map

Thursday, March 31, 2011
Google Presentations Guide
Creating & Publishing a Google Presentation
Login to your Gmail account and click 'Documents'.
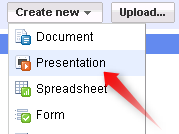
A new window will opne up. Click 'Create new'/ Presentation'


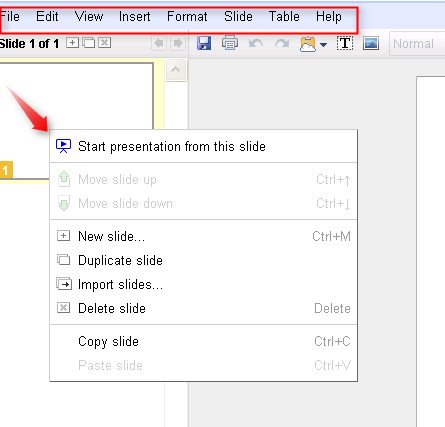
Another new window will open. This is your google presentation. To create and edit new slides, use the top menu or RIGHT click on slides.

You can export your presentation as a PDF or Powerpoint file so that you can use it without an internet connection. Click File/Download as/ and choose your desired file type.

You can also publish this online others can see it. To do so, on the top left part of the screen, click 'Share/Publish/embed'.

Click 'Publish Document'.

You will then see web address (URL) that you can use to link to your presentation and some code that you can use to embed it on another site. (stay tuned for some more specific instructions on how to do so).

Thursday, March 3, 2011
Google Tools
Google offers a vareity of tools that can be useful to educators.
Our primary browser during the course will be Chrome(Google's browser) and the first tools we'll explore are....
Later in the course (or sooner for those eager to 'sample from the buffet') we will experiment with
- Google Presentaitons
- Google Maps
- Google Forms
- Picasa (Google images)
- YouTube (Google Video)
- Google Sites
- Google Reader
- Google Calendar
Blogger Guide & Examples
 Blogger is Google's blogging platform. You can register for a blog at Blogger.comand your blog will be created at blogname.blogspot.com
You can see Jeff's Demonstration Blog here
- Blogger Basics
- Your Dashboard
- Creating Pages / Creating Posts
- Labels
- Posting Images
- Posting a YouTube Video on your blog
- Adding Gadgets to your sidebar
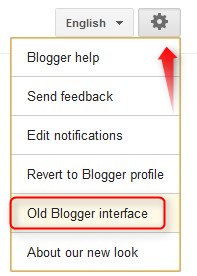 Blogger basicsTo get to Blogger, go to Blogger.com or click 'More/Blogger' from any Google page (gmail, docs, etc.)
Google is in the process of changing interfaces. For now, I suggest using the 'old' interface.
Creating a Blogger Blog
Go to Blogger.com and sign in with your gmail ID and password. This is the first screen you'll see.

Click 'continue' and set your language to 'English'.


The Blog address will be more challenging. You need to check availability for any address you choose. No spaces allowed.

When you have found one, click 'create blog' and you'll see this page. Click which template looks nicest to you. This can be changed later.


Your Dashboard
Your dashboard is were you can control all aspects of you blog. To get there click the orange B in the upper left corner of your screen.
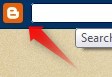
Your Dashboard looks like this

Creating Posts / Creating Pages
Most of the time, when you create content on your blog, you will create a 'post by clicking 'New Post' at the upper right corner of your blog page or on your Dashbaord.


To create a page, click 'Edit Posts' (confusing, I know).


Enter your title and body and 'Publish Page'.
For the purposes of this Course, please create the following pages.
- About Me
- Guides
- Resources
- Tasks
To make sure that these appear in the top menu, go to your dashboard and click Design. Add a Gadget as shown below.

Add the 'Pages' Gadget to the top menu block of your blog

Labels
Labels are used to create categories for your posts. Let’s create a Courses category on your blog. Click ‘New Post’.
Title:My TTP Courses
Body:I am taking the following courses as part of the PUFS Teacher Training Program.
CALL, Classroom English, Cultural Understanding, Drama, ER, Fun Fun, Games, Idioms, Listening, Outdoor Activity, Pronunciation, Speaking, Survival English, TLS, TRW, Writing
Body:I am taking the following courses as part of the PUFS Teacher Training Program.
CALL, Classroom English, Cultural Understanding, Drama, ER, Fun Fun, Games, Idioms, Listening, Outdoor Activity, Pronunciation, Speaking, Survival English, TLS, TRW, Writing
Labels (you can copy and paste these): CALL, Classroom English, Cultural Understanding, Drama, ER, Fun Fun, Games, Idioms, Listening, Outdoor Activity, Photos, Pronunciation Clinic, Speaking, Survival English, TLS, TRW, Writing

Publish that post. Now, go to your Dashboard/Design. Click 'Add a Gadget', and click the + next to Labels

Change the Title to 'Courses' and choose 'Selected Labels'.


You should now see the Course Section on you blog menu. Any time you create content related to a particular course, use the appropriate label.
Video Tutorials
Creating a blog and postingControlling Blog privacy
Changing the appearance of your blog.
To post photos on your blogger blog.
Create 'New Post' and choose the 'Componse' tab. Then click the Image icon.

Select 'upload' and choose file. Find the file(s) on your computer. You can select mulitple images if you like. Then click 'Add Selected.

Once the photo has been loaded if you mouse over it, you can select the site, orientation (left center right), add a caption, or remove it.

Posting a YouTube video on your blog
Go to YouTube.com. Find a video you'd like to post. Beneath the video, click 'share' and then 'more'.


Adding Gadgets to your Blogger Blog
From your Blogger Dashboard, click Design


Look through the different categories, select gadgets of interest


There is lots of help information at: http://www.google.com/support/blogger/
Specific help can be found at the links below
You can see examples below of English teachers from around the world who have a blogger blog
- Graham Stanley, Spain
- Nelba Quintana, Argentina
- Doris Molero, Venezuela
- FCE Blog, Claudia Ceraso, Argentina
- Michael Ivy, Italy
- English with Rosa
- Michael Ivy, Rome
- Daniel Kirk, Japan
- Maria Jordano, Spain
- Larry Rhoe, China
- Michael Coghlin, Australia
- Nancy McKeand, USA
- Jimbo(Jim Hall), Japan
- Dennis Newson, CTJ Online, Germany
- Marie Irene, Venezuela
- Vance Stevens, UAE
Creating & Publishing a Google Presentation
Creating & Publishing a Google Presentation
Login to your Gmail account and click 'Documents'.

Another new window will open. This is your google presentation. To create and edit new slides, use the top menu or RIGHT click on slides.
You can export your presentation as a PDF or Powerpoint file so that you can use it without an internet connection. Click File/Download as/ and choose your desired file type.
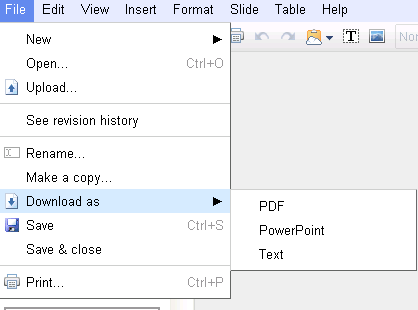
You can also publish this online others can see it. To do so, click 'File/Publish to the Web.

Click 'Start Publishing'.
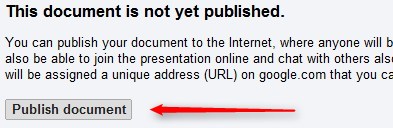
You will then see web address (URL) that you can use to link to your presentation. You can also select the player size and copy 'embed code' so that you can use to embed it on another site.

Subscribe to:
Posts (Atom)


